MM logo white 1
MM logo red
Image description is not available

Connecting a cooker: how do you do it?

Amina3 MAY 2026
A kitchen features white cabinets, dark countertops, and a black oven being repaired.

Have you bought a new cooker that you want to connect yourself? Then it’s important that you have the necessary knowledge. Otherwise, it’s better to call in a professional. Do you have knowledge of electricity and gas? Then you can do it yourself. Follow the steps on this page to connect your cooker.

How do you connect a cooker yourself?

A kitchen features white cabinets, a black and white oven, and a brick wall. Countertops hold utensils and decor.

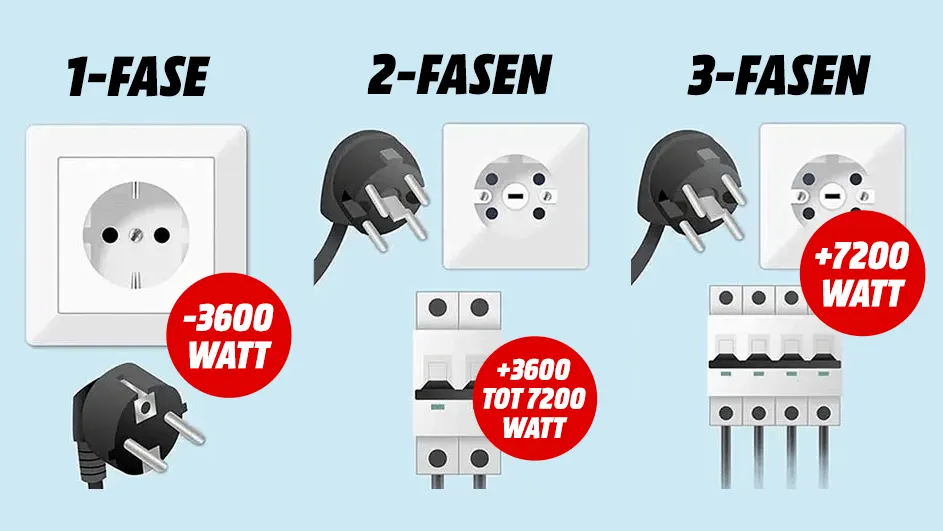
Connecting a cooker requires knowledge of electricity and gas, as it can otherwise be dangerous. With a gas cooker you must be very careful, while with an electric cooker a connection to a 2- or 3-phase cooker circuit is required. A normal socket isn’t sufficient. Therefore, first check whether your kitchen is suitable for the cooker you want to connect. If this isn’t the case, call in a certified electrician or professional. When you buy a cooker via our website or in the shop, you can choose to have the appliance installed immediately upon delivery by our professionals. This way you can be sure that the cooker is installed correctly.

2-phase or 3-phase cookers

The image shows three electrical systems: one, two, and three-phase, each with a socket, plug, and circuit breaker on a light blue background.

An electric cooker with a capacity above 3.6 kilowatts usually requires a connection to a 2- or 3-phase cooker circuit. A standard socket only provides 1 phase, while a 2- or 3-phase connection distributes the power over multiple phases, ensuring sufficient capacity for powerful hobs. Cookers between 3.6 kilowatts and 7.2 kilowatts usually require a 2-phase connection, while cookers with a capacity above 7.2 kilowatts require a 3-phase connection. It’s essential to check whether your kitchen installation is suitable for such a connection, which often means installing a separate cooker circuit connected to your fuse box. This work must always be carried out by a certified electrician to guarantee safety and proper operation.

Connecting an electric cooker

Pink couch next to stainless steel oven and white cabinets. Black and white checkered floor.

Do you want to connect an electric cooker, such as an induction cooker or ceramic cooker, in your kitchen and is your electrical connection suitable for this? Then you can easily get started yourself.

Connecting an induction cooker or ceramic cooker

  1. Safety first: switch off the fuse of your cooker in the fuse box. Not sure which fuse is the right one? Then switch off the entire power supply for maximum safety.
  2. Preparation: remove the cover plate and the fixing bolts from the connection point.
  3. Connecting: connect the wires of the cooker to the correct connections of the socket. In doubt? Then have this step carried out by a certified electrician.
  4. Finishing: reattach the cover plate in its place.
  5. Testing: check whether your cooker works properly by testing it thoroughly.

View our electric cookers

Connecting a gas cooker

A kitchen features a black Smeg range cooker between white cabinets. The backdrop includes a brick wall and countertop items.

Do you want to connect a gas cooker? Then preferably call in a professional. Gas is a dangerous and flammable substance, and an incorrect installation can have serious consequences. Do you have experience installing a gas cooker or working with gas? Then you should follow the steps below:

  1. Safety first: switch off the gas supply and wait long enough until there’s no more gas in the pipes. This remaining gas can also cause damage. Check whether the gas tap and coupling are clean and in good condition. Carry out the same check on the connection of your new cooker.

Close-up of a gas stove with four burners lit, showing blue flames. The stove has black grates on a light-colored surface.

2. Connecting: with your gas cooker you receive a flexible gas hose. Connect this to the gas tap and tighten the connection firmly using the correct spanner. Attach the other end of the hose to your cooker.
3. Check: use a gas leak detector to check that there are no gas leaks. Never skip this step.
4. Switching on: if you are certain that there are no leaks, you can switch the gas supply back on.

Important: Do you smell gas or are you in doubt? Call the fire department immediately and leave your home.

Our advice on connecting a cooker

Modern kitchen: stainless steel stove centered between light wood cabinets, white countertop, cutting boards, and bottle.

If your connection is up to date, connecting a new cooker can go very smoothly. If this is not the case, make sure you use our service for connecting your new cooker. If you do it yourself, carefully check the available connection and follow our step-by-step plan.

These articles might be interesting for you